Tuesday, January 29, 2013

A Vest Onesie Set For Girls

When I first started making baby clothes, I was just making gifts to give to friends. I made the set below for a friend's baby boy about a year ago.

(Forgive the picture quality, it was just for my own personal use.)  

A couple of days ago, a young mom found this picture on my Facebook page and absolutely loved the outfit! BUT she is expecting a little baby girl. She asked if I could make it pink and girly...and I have to admit, I was a bit of a skeptic myself, at first. 

Of course, we looked on Pinterest and Etsy...and though we found some really great ideas, there really weren't any girly vest onesies! But after going over some different options and brainstorming with my mom, I finally got a finished product that I absolutely love!

I didn't think the tie would ever be girly. So, what better to replace it than ruffles, ribbon, and lace? And of course, every girl needs a coordinating hair piece!


post signature

Wednesday, January 9, 2013

Tutorial: Hand Painted Canvas Shoes

A few months ago my mom and I found these shoes on Pinterest. Now, I'm a Rangers fan. But my mom is a RANGERS FAN. Serious.

So she has been teasing me about painting her some shoes off and on since we saw these shoes.

My mom has never worn Toms before, and 44-54 dollars seemed a little steep for shoes that I might very well ruin. Because let's face it, I am, admitttedly, a self-proclaimed terrible painter. So me messing up 50 dollar shoes was very likely.

So after a few months, my mom and I actually started looking for similar shoes. I finally stumbled upon these at Target.

*Please forgive the poor quality photos. I took these before I had a digital camera. And can't retake them now that the shoes are done...and no longer in my possession.


Not much to look at. But they are similar to Toms and were only $16.99. We could deal with me messing up 17 dollar shoes.

So after googling my little heart out trying to figure out if I should use Sharpies, Paint Pens, Acrylic Paint, or Fabric markers...I finally got started. I'm no expert on this by any means, but for those of you out there who might want to try this yourself, I'll take you step by step on how I chose to do them.

First, I drew a sketch on paper of what I planned on doing to the shoes. I am much better with pencil, paper, and sharpies than paint, so the sketch looks better than the end result of the shoes.


The flag is definitely off centered..but this is what I was hoping for.

Just as a side note, if you're up for trying this yourself, I would suggest not doing stripes. (At least, if you are impatient like me.) It's really hard to draw long straight lines on shoes. For me, anyways.

I finally started on the shoes. First, I drew the sketch in pencil on the shoes. I did my best to draw lightly, because pencil doesn't exactly erase off of shoes. (It helps to stuff at least the toes of the shoe with newspaper, plastic grocery bags, etc so that the shoes will keep their form. )


Pretty hard to see, but I think you get the idea. I was pleasantly surprised at how easy it was to draw on the shoes.

The next step is probably not necessary, but it was helpful for me. I'm sure there is something better suited to use, but I decided that since my favorite thing to use is Sharpie, I would trace my designs with it. So I traced over all of the pencil in the color of Sharpie I would paint each design. I used my ultra fine tip Sharpies, for finer detail. Plus, the normal Sharpie markers seem to bleed more noticeably.

*My mom did discover that the sharpie will bleed when washed. At least the red one did. She has pink tinted shoes to show for it.


I was still nervous at this point about trying to paint the shoes. But I finally decided I liked the look of acrylic paint the best, so I went for it. I already had a ton of run-of-the-mill acrylic craft paint, but decided that acrylic paint used by actual artists would be better for this. There are several different types and brands of artistic acrylic paint to choose from, you can find them at Michael's, Hobby Lobby, etc. (I honestly just opted for Liquitex because it was the cheapest.) Acrylics aren't really made to paint on fabric, so I picked up some Fabric Medium at a local art supply store. It's supposed to help make the paint softer and keep it from cracking. I'm not sure it'd did that, but it was worth a shot. And because, as already stated, I'm not a good painter, I found a paint brush with very short, stiff bristles. It made it much easier to control where the paint went.


Nervously, carefully, and as slowly as I could handle, I started painting. I started with the lightest color and worked my way to the darkest. It took several coats to make sure everything was covered, but I was relatively pleased with the end result.


As with all craft projects, there are definitely imperfections. But I think they turned out well. The only problem: my mom hasn't tried them on yet.

Let's just hope they fit!

*They did fit!

Update: Here is another pair that I made using the same method. I like these much more.


Thursday, December 6, 2012

‘Tis the Season!

I have never been a huge fan of Christmas. Well, at least the commercialized version.
But this year, I was really excited to get to decorate our apartment for Christmas. Maybe it was because it’s our first one as a married couple. Maybe it was because it was the first time I actually got to pick out my own decorations and do everything myself. And maybe it was because Pinterest is filled with a ton of amazing ideas. Definitely all of the above.

I still feel like there should be more decorations…but it’s our first Christmas, can’t go all out and buy everything at once! These things are supposed to be accumulated over time, right?

Well, since I had never been a fan of the traditional red and green Christmas colors, I decided I was definitely going to have to change it up. As luck would have it, the vast majority of our decorations are navy, light blue, white, and silver. I know, I know…you’re surprised. But I have to say, Scott was for the color scheme just as much as I was.

Now for some pictures and links.

Scott found this little guy at Walmart, so we had to get him.

IMG_0170

Pinterest has a lot of hoilday printables, and I found a couple to match frames that I already had. (The website where I found the Subway Art printable has free printables for almost every holiday. So check those out, too.) In between them is a mini Christmas scrapbook of sorts made out of paper bags. I made that a couple of years ago with my Mahm & Aunt Karri. And there is our first little nativity scene.

 
Free Merry & Bright Printable // Free Christmas Subway Art Printable

And today, because most Christmas printables seem to be in red & green, I decided to make one of my own. I need to buy a frame to put it in, but feel free to download it if it goes with your Christmas decorations.
(Click to enlarge and then "Save As.") It should be 8x10. The background is also transparent, so you could print it on any color of paper you would like.


I found this banner template and tutorial that I really liked (even though it was red & green) so I put it together and along with a red Santa hat Scott picked out, decorated this frame I got a while back from Ikea.

 Free Noel Banner Printable

Now for the two biggest projects. You know I couldn’t have done Christmas decorations without having to sew something.

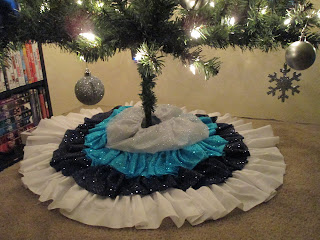
My Mahm used to always see these ruffled tree skirts on Pinterest. And of course she always teased that I should make her one. I always meant to…but just haven’t gotten around to it. But then I decided that I should have one! :)

As luck would have it, my color scheme wasn’t too popular in the Christmas fabric sections of Joann’s or Hobby Lobby…so I had to go another route. I’m not normally one for glitter and sequins, but those are just about the only things I could find in the right colors. It’s pretty large and took a while, but it’s actually really simple.


 And our Christmas tree with the skirt.


Ruffled Tree Skirt Tutorial

I then decided that making stocking would be better and maybe cheaper than buying them. Once again, I couldn’t find fabric to match the color scheme very well, but I figured grey was close enough to silver for it to work.

I followed the main “sock” part of the tutorial, but wanted to make a somewhat manly stocking for Scott and prettier ruffles for my own stocking.

I have to warn you, you can’t tell from the picture, but these stockings are HUGE. I didn’t know stocking stuffers were supposed to be as big as iPads and a pair of shoes! I’m telling you, they would fit in these stockings.

Free Stocking Tutorial & Pattern

I’ll probably add more, because I like to overdo things, but that’s all for now.
So there you have it. Our first married Christmas and all of the decorations that come along with it. 

Friday, November 30, 2012

A Flannel Memory

In my last crafy post, I shared a flannel onesie that I had made. I had to be pretty cryptic about my inspiration, because it's a surprise. Now that it is officially finished and in the mail, I can no longer keep it a secret.

My mom's dad (we call him Bobo) always wore button up shirts. Mostly the pearl-snap, flannel, or plaid variety. When he died last year, one of the things that often crossed my mind was the fact that my (future) kids and my husband would never get to meet him. It made me sad, because I knew they would have loved him and he would have loved them.

When my grandma had to move and didn't have enough room for everything in her new house, I knew that I wanted to get some of Bobo's old shirts to make into baby clothes. Even though my kids will never get to meet him here on earth, I thought it would be special for them to have something of his. 

When my nephew was born in September, I thought that he should have something of Bobo's, too. So after figuring out the logistics with the first, practice flannel onesie, I (eventually) got to work. 

I have to tell you, I had a lot of mixed emotions when I got out the shirts. I was afraid to cut them. I didn't want to ruin them. They still smell like him...these shirts that my grandpa wore every time he hugged  me and kissed my cheek. I was both happy and sad as I remembered.

But, I'd like to think that my nephew, and someday my own kids will wear his old clothes, and remind us that memories can be more sweet than sad. And even though one life has ended, we all carry him with us. These new lives that are just beginning will get to wear his memory and will eventually treasure something so precious from a great grandpa they never got to meet, but will love anyway.


Update: Here is a picture of my nephew wearing Bobo's shirt...sitting in Bobo's chair. 


My mom and brother are working on finding a picture of Bobo wearing this shirt. And then they plan on putting his picture and little Z's picture in a shadow box with the onesie. Cool, huh?


The Beginning of Ruffled Blues

So I finally decided to make a separate blog solely dedicated to my crafts. I know some people enjoy them, but really, the purpose of my personal blog was to update everyone on our life as newlyweds. I mean, I guess I can't help that my life right now consists of making crafts, but not everyone wants to read about them.

And so it begins. This is going to be my craft blog. Here you will be able to keep up with the things I have been creating, and also, if you so choose, will be able to order/purchase something.

For now, I am just going to start out with pictures of some of the things I have made and will possibly be available for purchase in the near future. 

For now, you can check out my Facebook page or contact me at ruffledblues@gmail.com if you have interest in ordering something!
  
Prepare for picture overload. :)

   Mila Baby Shoes
Pattern by Laura Gaag


Onesie sets for Baby Girl


Onesie Sets for Baby Boy

"Little Man" Shoes
Pattern by Shwin Designs

 The Adelaide Dress Ruffled Blues Original


Baby Boots
Pattern by Baubles & Bits. Visit her shop here:
http://www.etsy.com/shop/baublesandbits

Volleyball Onesies
Ruffled Blues Original

 Flannel Onesie


This will be a work in progress for a while, so bear with me as I build this up.